生成器模式:像搭乐高一样造对象
订外卖的时候,你可能会这样点:基础套餐 + 加辣 + 加蛋 + 不要香菜。每个选项都是可选的,最终组合出你想要的餐品。这就是生成器模式的思想—— 分步骤构建复杂对象,每步都可以灵活定制。
生成器模式(Builder) 让你能够分步骤创建复杂对象,使用相同的构建代码生成不同类型和形式的对象。
为什么需要生成器?
假设你要创建一个"房屋"对象,它有很多可选参数:
// ❌ 糟糕的写法:构造函数参数爆炸
func NewHouse(
    windows int,
    doors int,
    rooms int,
    hasGarage bool,
    hasSwimmingPool bool,
    hasGarden bool,
    hasStatue bool,
    // ... 还有更多参数
) *House {
    return &House{...}
}

// 调用时很痛苦,而且容易搞混参数顺序
house := NewHouse(4, 2, 3, true, false, true, false, ...)
这就是著名的"伸缩构造函数"问题(Telescoping Constructor)。参数越多,代码越难读。
生成器模式的解法: 把构建过程拆成多个步骤,每次只设置一个属性。
模式结构
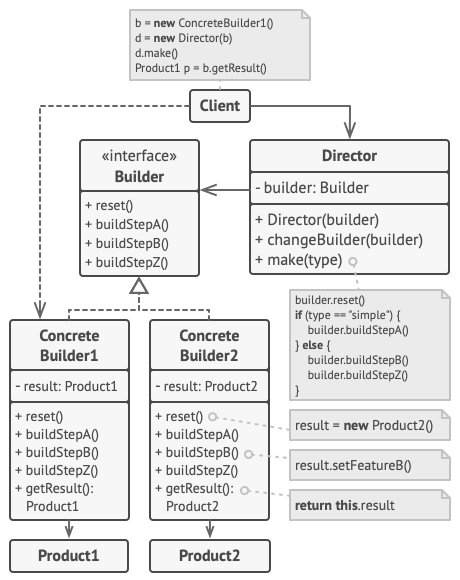
| 角色 | 职责 | 类比 |
|---|---|---|
| Builder(生成器接口) | 声明构建产品的通用步骤 | 建筑蓝图 |
| ConcreteBuilder(具体生成器) | 实现具体的构建逻辑 | 木屋建造队、冰屋建造队 |
| Product(产品) | 最终生成的复杂对象 | 房屋 |
| Director(主管) | 定义构建步骤的调用顺序 | 建筑监理 |
动手实现:房屋建造系统
用建造不同类型房屋来演示生成器模式。
第一步:定义生成器接口
package main

// IBuilder 生成器接口,定义建造房屋的步骤
type IBuilder interface {
    SetWindowType()
    SetDoorType()
    SetNumFloor()
    GetHouse() House
}

// GetBuilder 根据类型返回对应的生成器
func GetBuilder(builderType string) IBuilder {
    switch builderType {
    case "normal":
        return NewNormalBuilder()
    case "igloo":
        return NewIglooBuilder()
    default:
        return nil
    }
}
第二步:定义产品
第三步:实现具体生成器
package main

// NormalBuilder 普通房屋建造器
type NormalBuilder struct {
    windowType string
    doorType   string
    floor      int
}

func NewNormalBuilder() *NormalBuilder {
    return &NormalBuilder{}
}

func (b *NormalBuilder) SetWindowType() {
    b.windowType = "🪟 木质窗户"
}

func (b *NormalBuilder) SetDoorType() {
    b.doorType = "🚪 木质门"
}

func (b *NormalBuilder) SetNumFloor() {
    b.floor = 2
}

func (b *NormalBuilder) GetHouse() House {
    return House{
        WindowType: b.windowType,
        DoorType:   b.doorType,
        Floor:      b.floor,
    }
}
package main

// IglooBuilder 冰屋建造器
type IglooBuilder struct {
    windowType string
    doorType   string
    floor      int
}

func NewIglooBuilder() *IglooBuilder {
    return &IglooBuilder{}
}

func (b *IglooBuilder) SetWindowType() {
    b.windowType = "❄️ 冰块窗户"
}

func (b *IglooBuilder) SetDoorType() {
    b.doorType = "🧊 冰块门"
}

func (b *IglooBuilder) SetNumFloor() {
    b.floor = 1
}

func (b *IglooBuilder) GetHouse() House {
    return House{
        WindowType: b.windowType,
        DoorType:   b.doorType,
        Floor:      b.floor,
    }
}
第四步:创建主管(可选)
package main

// Director 主管,负责按顺序调用建造步骤
type Director struct {
    builder IBuilder
}

func NewDirector(b IBuilder) *Director {
    return &Director{builder: b}
}

func (d *Director) SetBuilder(b IBuilder) {
    d.builder = b
}

// BuildHouse 按标准流程建造房屋
func (d *Director) BuildHouse() House {
    d.builder.SetDoorType()
    d.builder.SetWindowType()
    d.builder.SetNumFloor()
    return d.builder.GetHouse()
}
第五步:使用生成器
package main

import "fmt"

func main() {
    // 获取普通房屋建造器
    normalBuilder := GetBuilder("normal")
    director := NewDirector(normalBuilder)

    normalHouse := director.BuildHouse()
    fmt.Println("=== 普通房屋 ===")
    fmt.Printf("门: %s\n", normalHouse.DoorType)
    fmt.Printf("窗: %s\n", normalHouse.WindowType)
    fmt.Printf("楼层: %d\n", normalHouse.Floor)

    // 切换到冰屋建造器
    iglooBuilder := GetBuilder("igloo")
    director.SetBuilder(iglooBuilder)

    iglooHouse := director.BuildHouse()
    fmt.Println("\n=== 冰屋 ===")
    fmt.Printf("门: %s\n", iglooHouse.DoorType)
    fmt.Printf("窗: %s\n", iglooHouse.WindowType)
    fmt.Printf("楼层: %d\n", iglooHouse.Floor)
}
链式调用:更流畅的 API
生成器模式常与链式调用结合,让代码更优雅:
实现方式:每个方法返回 *Builder 本身:
什么时候该用生成器?
| 场景 | 说明 |
|---|---|
| 构造函数参数过多 | 超过 4-5 个参数时考虑使用 |
| 需要创建不同表示 | 同样的构建过程,不同的产品形态 |
| 构建过程复杂 | 涉及多个步骤,且步骤可选 |
| 产品不可变 | 一旦构建完成就不能修改 |
常见应用 :
- SQL 查询构建器 :
SELECT().FROM().WHERE().OrderBy() - HTTP 请求构建 :设置 URL、Header、Body
- 文档生成 :PDF、HTML、Markdown
- 测试数据构造 :单元测试中构造复杂对象
优缺点分析
| ✅ 优点 | ❌ 缺点 |
|---|---|
| 分步构建 :可以暂停、延迟、递归构建 | 类数量增加 :需要创建多个生成器类 |
| 代码复用 :不同产品可复用相同构建代码 | 对简单对象过度设计 |
| 单一职责 :构建逻辑与业务逻辑分离 |
生成器 vs 抽象工厂
| 特性 | 生成器模式 | 抽象工厂模式 |
|---|---|---|
| 关注点 | 分步构建一个复杂对象 | 创建一系列相关对象 |
| 返回时机 | 所有步骤完成后返回 | 立即返回 |
| 产品类型 | 通常是单一复杂对象 | 一系列配套产品 |
一句话总结 :生成器模式就像乐高积木——你可以用同样的零件(步骤),按不同顺序拼出不同的造型(产品)。